As a 3D printing enthusiast, I’ve encountered my fair share of problems with STL files. Often I worry whether an STL I downloaded online will even successfully print or not. These files sometimes come with issues that can derail the printing process even before it begins. It is important to understand and identify the errors in the STL file for every person doing 3D printing. In this article we will go over the different types of common STL file errors, how they impact the 3D printing process, and how to check STL files for 3D printing. Some people may have trouble opening their STL files, or even wonder if downloading one from the internet is safe. We will cover these concerns as well. Lastly, we will provide insights into how to address these errors and have a smooth 3D printing experience.
We’ve created an audio version of this article for quick and easy access. Listen along to learn the step-by-step process for fixing common errors in STL files.
Identifying Common STL File Errors
While mesh faults might not be immediately apparent, they can lead to significant failures in the 3D printing process. Problems with STL files can arise during the scanning of real-life objects or through manual design. To maximize our chances for a high-quality print, let’s try to understand what the prevalent STL file errors are:
“To ensure a mesh is print-ready, it must be watertight (meaning it must have no holes), it must be manifold (a closed volume), contain no self-intersections and no degenerate triangles, and maintain consistent normals across its surface. “
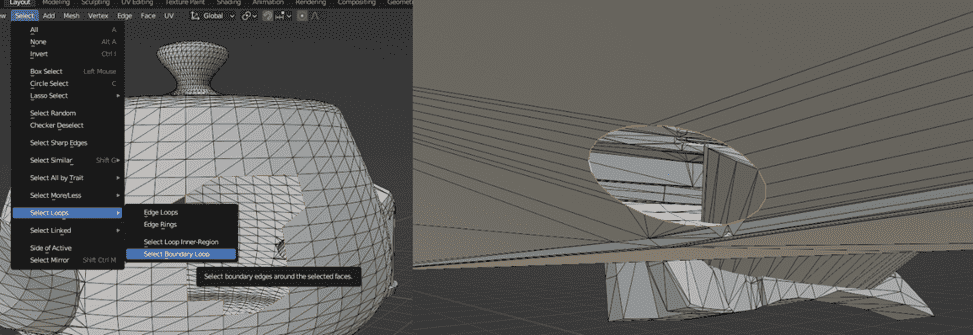
Holes
Meshes used in 3D printing must be watertight. Imagine you dip the model into water, if the model contains holes, water can get inside the surface. A watertight mesh ensures the object being printed is solid and structurally sound. Holes may cause poor print quality, printing errors, or incomplete prints.
To find the holes in our STL model, we can import it into Blender. Switch to Edit Mode, press A to select all edges, then press Select > Select Loops > Select Boundary Loops to select all the edges of the holes.
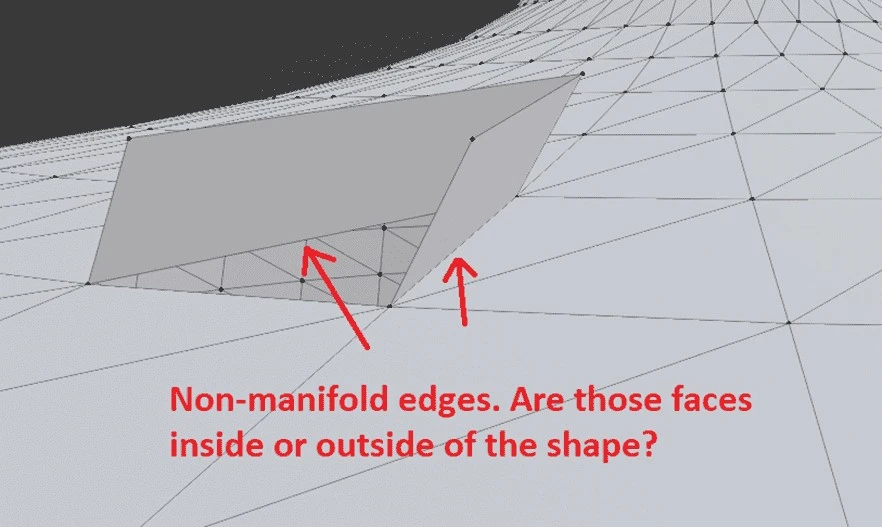
Non-Manifold Edges
A model used for 3D print must be manifold, which means to have a well-defined closed surface. A human (as well as slicing software) can easily distinguish the inside and outside of a manifold object. A non-manifold edge makes a model non-manifold. Non-manifold edges occur in a 3D model when an edge is shared by more than two faces. In a well-formed 3D model used for 3D printing, each edge should only be shared by exactly two faces.
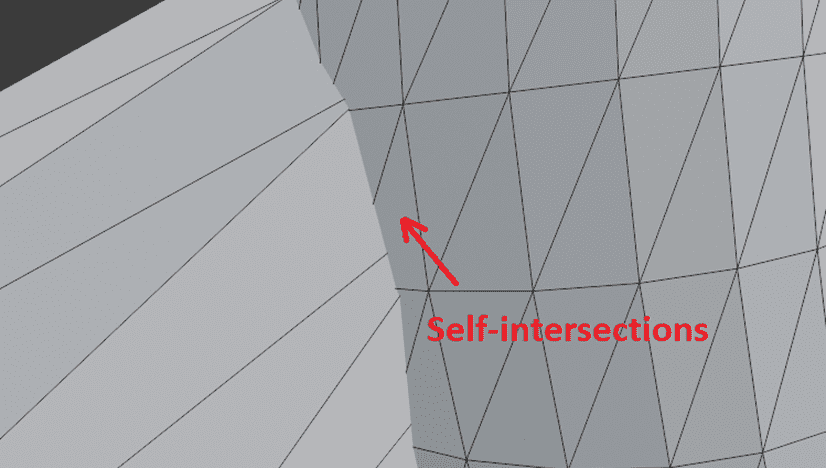
Self-intersections
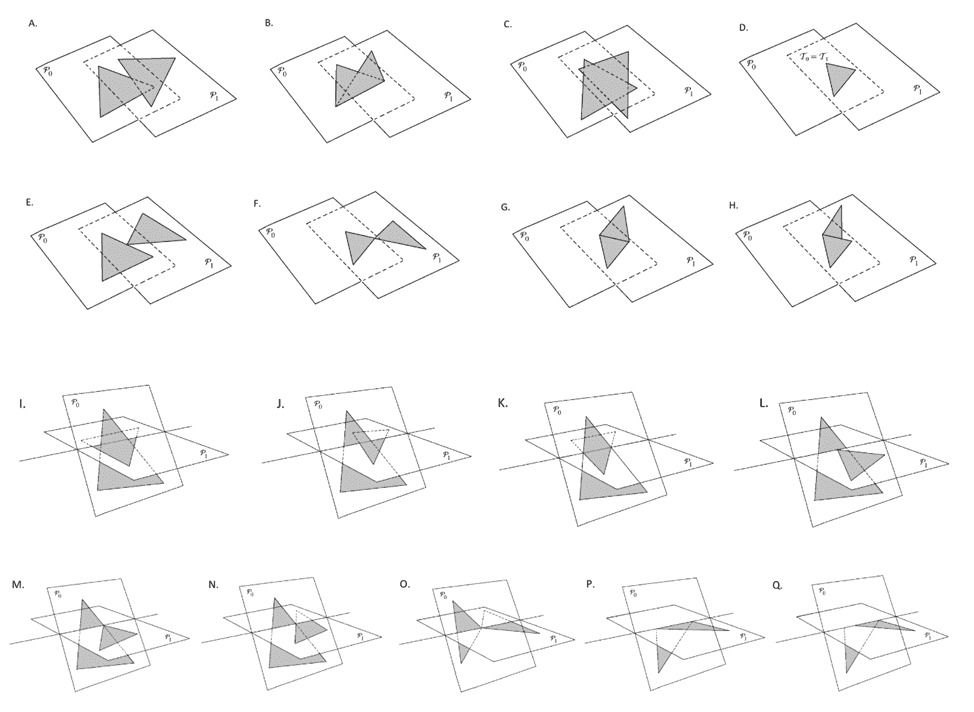
In a 3D mesh, triangles can at most share an edge or a vertex. If they overlap or intersect each other, again the distinction between the inside and outside of the model won’t be clear, making it non-manifold. Below we can see some configurations drawn for intersecting triangles. Among these, only (F, G, O, P) are valid and can be part of a 3D printing mesh.
Degenerate Triangles
A degenerate triangle refers to a triangle that has zero area. This occurs when the three vertices of a triangle exist on the same line. Degenerate triangles can negatively affect the quality and integrity of a 3D print.
Inconsistent Normals
In 3D graphics, normals are vectors perpendicular to the surface of each triangle. The direction of each normal vector indicates the direction of its face. Normals are important for calculating lighting and shading. Normal vectors in 3D geometry can be manually defined by a user, but they are generally calculated from vertex ordering by using the right-hand rule. Imagine, you put your right hand on the surface of a triangle, perpendicular to it. Then, you point all of your fingers towards the first vertex. By curling all of your fingers in the direction of the second vertex (you might need to flip your hand!), your thumb will give the direction of the normal vector. Another description would be: if the vertices are ordered counter-clockwise, you are looking at the front of the face and the normal is pointing towards you. In a 3D STL mesh, normal vectors must be consistent. That means the orientation of the vertices of each face, must be similar to the orientation of its neighbors.
Problems with STL files and impact on 3D Printing
Problems with STL files can disrupt our 3D printing process, leading to missing faces, poor resolution, or geometric inaccuracies. The severity of the issue may prompt our 3D printing service to outright reject the order, increase its cost, or create a defective component. We may be forced to re-print our model, which is time-consuming and a waste of material. This is why repairing and rectifying STL file errors is imperative to the 3D printing process.
Some common repercussions of the issues mentioned previously are:
- Holes in the mesh can lead to weak spots in the printed object. The 3D printer may have difficulty interpreting where to deposit material, causing flawed or incomplete prints. If a hole appears on a curved surface, the software might even fill it incorrectly.
- Non-manifold edges will not slice correctly. A 3D printer requires clear instructions on what to print. Slicers don’t know how to deal with geometry that can’t exist in the real world. Non-manifold edges create ambiguities, leading to inconsistent surfaces that may result in printing errors.
- Self-intersections can create ambiguities in defining the volume of the object. They can create issues in how the printer interprets what needs to be filled or left empty. The slicing software may produce errant gaps or undesired solid regions.
- Degenerate triangles may create uneven or rough surfaces, causing inaccuracies in printed layers. Furthermore, degenerate triangles can even result in printing failures and aborted prints.
- Inconsistent normals can confuse a 3D printer on the surface orientation. When trying to print a hollow design with inverted normals, the printer can end up filling the inside of the shape.
While these issues are among the most common, STL file errors can also include unwanted artifacts, noise shells, inappropriate wall thickness, etc.
STL File not Opening
In the process of 3D printing a file downloaded from the internet, we may encounter some issues. These problems can typically be traced back to one of several common causes:
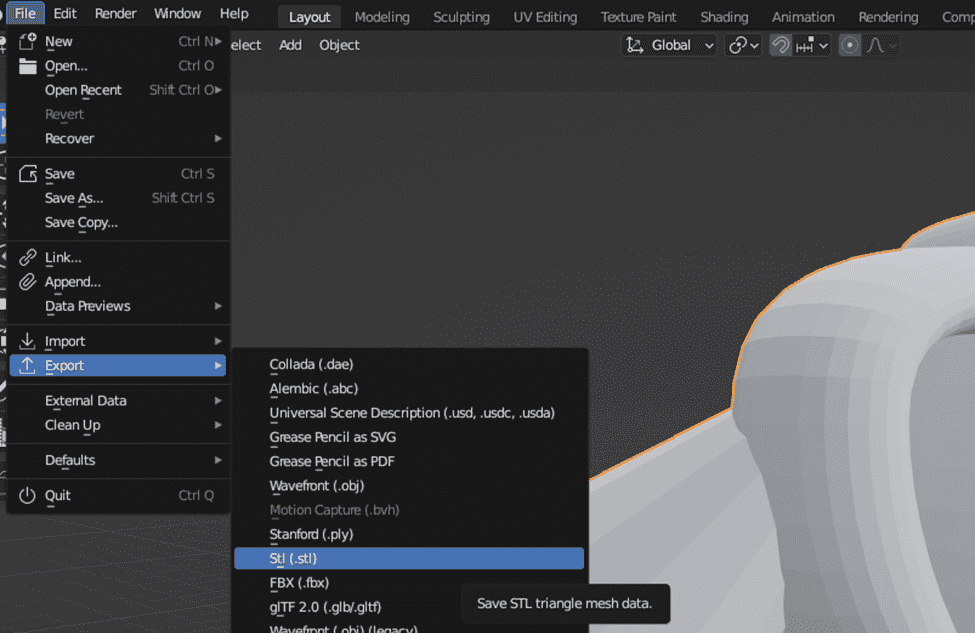
Incorrect File Type: The first step to 3D printing is to obtain a model that is ready for 3D printing. The format for this file must be “.stl”. To verify, open the file properties and confirm it reads “Stereolithography Mesh”. If this is not the case, consider using 3D modeling software or an online converter tool to convert the file to STL format. For example, you can use Blender. Import the 3D model into the program, select it, and press File > Export > STL.
Corrupted STL File: An STL file not opening might be corrupted. This might be a result of an incomplete download, or disk errors. We can attempt to redownload the file from the source. We can tell if an STL is corrupt when opening it in a 3D modeling software like Blender. If we import it and, for instance, the imported model shows nothing in the scene, there is a chance the STL file is corrupted.
Using Incorrect Software: There’s a chance that our operating system is associating STL files with the wrong software. In that case, when double-clicking an STL file, either nothing will happen or some software will just open up. We can make sure of this by right-clicking on our STL file and choosing “open with”.
Excessive File Size: Some STL files with intricate details might have a large size. If our computer does not have sufficient resources, attempts to open the file may result in slow loading times or the STL file not opening. To alleviate this, we may try to compress the file by simplifying the mesh. There are several tools online that can do this automatically such as the Nano3DTech Simplify STL tool.
Broken Mesh: If the STL file can be opened with 3D modeling software but fails to open inside the 3D slicing software, it may be because the mesh is too broken for the slicer to handle it. In this case, we can consider using a mesh repair tool to fix the issues with the model.
By understanding the common issues with STL files, we can more effectively troubleshoot problems when they arise.
Can STL Files have Viruses?
When downloading STL files from the internet, it’s natural to question whether they carry the risk of introducing viruses to our computer or 3D printer. “Can STL files have viruses?” is a valid concern, given the increasing complexity of cyber threats. However, we have to understand that STL files themselves are not executable, making them less likely to be direct carriers of malware. STL models are simple data files containing geometric information – coordinates and faces referencing those coordinates – that make up a 3D shape.
That being said, any file, including STL files, could potentially exploit the vulnerabilities in the software used to open them. For example, a crafted STL file can be used to exploit a bug in 3D printing software. The real risk comes from where these files are downloaded from and how they are packaged. An STL file compressed in a ZIP archive could be bundled with malware. It’s important to be cautious when downloading STL files from unverified sources.
To stay safe and mitigate these risks, here are some guidelines:
Use Antivirus Software: These programs can scan our downloads for known malware and notify us of potential threats. Alternatively, we can use online platforms to check our files for viruses remotely.
Download from Reputable Sources: Well-known 3D printing communities, such as Thingiverse are known for their safe downloads. However, we should always consider reading user feedback before downloading.
Keep Software Updated: Regularly updating our slicing software and antivirus will help prevent virus threats. Developers patch known vulnerabilities when they find them and ship new updates so we must make sure to keep our software updated.
Consider File Integrity: If the STL file downloaded comes as part of an unexpected software package, it may be bundled with malicious software. It is important to verify the contents of the file we download and delete it if it’s suspicious.
There are also concerns about the potential for G-code files to include instructions to damage our printer. For example, telling the printer to turn up the temperature, or ram the nozzle into the bed. These risks are also theoretically possible but very unlikely.
In conclusion, the risk of contracting a virus from an STL file is low. If we can use an antivirus and stay away from sketchy pirate sites, we will be fine.
Preventing Future STL File Errors
To achieve successful 3D prints it is essential to ensure the integrity of the STL file before initiating the 3D printing process. To minimize the risk of printing errors, we can use a reliable STL repair tool. This type of software can automatically fix common issues like holes, non-manifold edges, self-intersections, etc.
By importing our STL file into a mesh repair tool like Meshmixer, Adobe Fusion 360, or Netfabb, we can use the program’s analysis and repair functionalities to find and correct problems with STL files. The Nano3DTech mesh repair tool also offers a one-click solution to prepare STL files for 3D printing. We can upload our 3D model and click repair; the program will automatically fix issues and prepare the corrected file for us.
After running our STL file through a repair tool, to check the STL file for 3D printing we must review the model in slicing software. The slicing software will preview how the model will be printed and its different layers. This can be used to spot potential problems such as unsupported overhangs, thin walls, or areas that may need additional support.
Oversized STL files plague the internet and are a pain to work with for 3D printing. If you’ve downloaded or bought a precious high-resolution model that is oversized, chances are you will have difficulty printing it. This is why we should learn how to make STL files smaller without losing printing detail. In this guide we will go over the challenges of dealing with large STL model sizes and why we should reduce them. We have included step-by-step guides using some widespread software used in the 3D industry. Some technical details are also included to make you more comfortable when choosing the right tool. In the end, we will introduce our very simple “one-click” online tool to help you decrease STL file size without any trouble.
Why is my STL File so Large?
An STL file is a collection of triangles that make up the surface of a 3D mesh. The more triangles exist, the higher the STL model size will be. A higher count of smaller triangles makes the surface appear smoother but comes at the cost of increased file size. Working with a heavy STL file can be difficult in printing software, and if it’s large enough the printer might even run out of memory. Often when we end up asking ourselves “Why is my STL file so large?”, it doesn’t even have to be that large. In most cases, it is possible to replace a dense patch of tiny triangles with fewer big triangles, without any significant loss of detail. 3D designers need to keep this limitation in mind when creating a mesh.
Why Reduce Mesh Size?
If we’ve downloaded a high-quality 3D model from the internet, we might want to reduce mesh size before using it in 3D printing.
- A big file will be difficult to transfer and store, especially if we want to use an online service of some sort.
- Performing modifications such as orienting, adding supports, hollowing, wall thickness adjustment, adding embellishments, etc. may result in crashes and failures.
- Using a very high-resolution mesh can also slow down or crash a slicer. Some slicer software may even refuse extremely large models (200MB+).
While it’s important to reduce mesh size for the reasons mentioned above, we must keep in mind that detail is lost along with file size. This can result in angular or faceted surfaces, rounded edges, and intricate details disappearing entirely. Finding the right balance between detail and efficiency will result in a better printing experience.
How to Make STL Files Smaller
To make an STL file smaller, we must reduce the polygon count. Some techniques reduce the model’s complexity and polygon count called “decimation” or “mesh simplification”. This process is available in many 3D modeling software tools like Blender, Fusion360, MeshLab, etc. The table below shows our experience in simplifying a benchmark STL using different tools.
| Tool | Online/Offline | Free/Paid | Compression | Speed | Ease of use |
| Blender | Offline | Free | High | Very High | Easy |
| Fusion360 | Offline | Paid | Medium | High | Medium |
| MeshLab | Offline | Free | Medium | High | Easy |
| 3DLess | Online | Free | Low | Medium | Very Easy |
Blender
In Blender, we can apply modifiers to meshes. Modifiers are automatic operations that can be used to perform effects that would be difficult to do manually. One of these operations is called the decimate modifier. Blender’s official documentation for decimate has a comprehensive explanation of what decimate is and the different types of options we can use. But for now, we will have a simple step-by-step guide on how to make STL files smaller using the decimate modifier:
- Import the model by going to File > Import > STL and choosing your mesh.
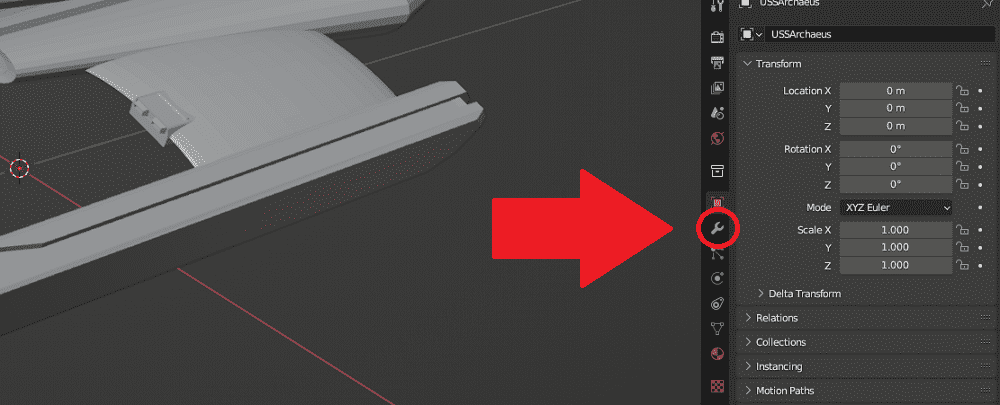
- Go to the object properties and click on the blue wrench icon to access modifiers.
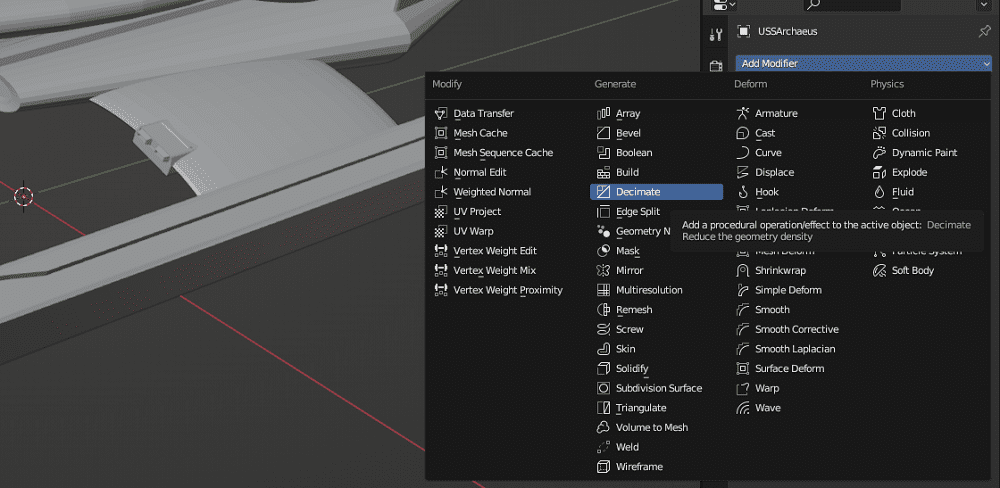
- Click on “Add Modifier” and choose Decimate.
- Choose the ratio by which you want the mesh to be decimated and press enter. A lower number means more decimation and a smaller file size, but more loss of detail.
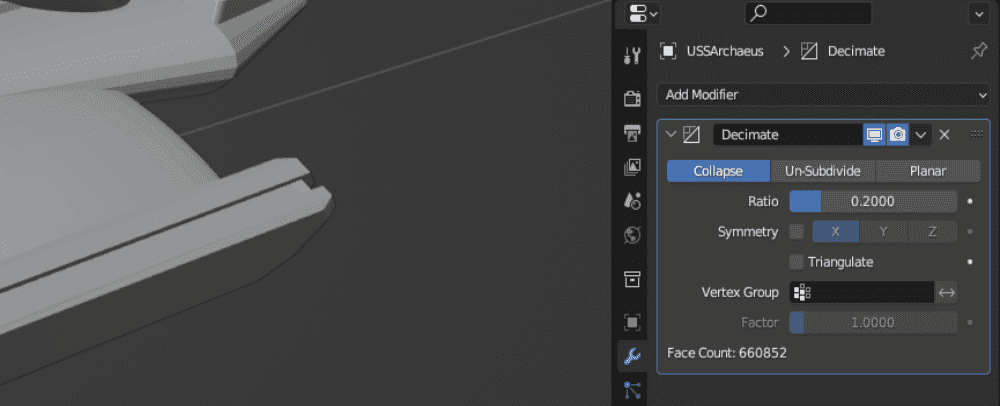
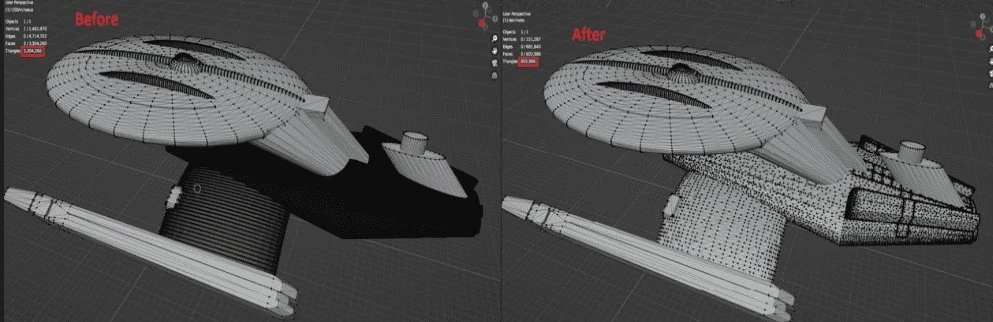
- Export the STL by going to File > Export > STL.As you can see in the picture below, the decimate modifier reduced the number of triangles from 3,304,260 to 602,986 without any significant loss of detail. Blender helped reduce mesh size from 218MB to 32MB which is much more suitable for 3D printing.
Autodesk Fusion360
Fusion is commercial CAD software with many useful features for 3D printing. On its website, you can sign up for a free 30-day trial. In Fusion, the Reduce command reduces the number of triangles on a mesh.
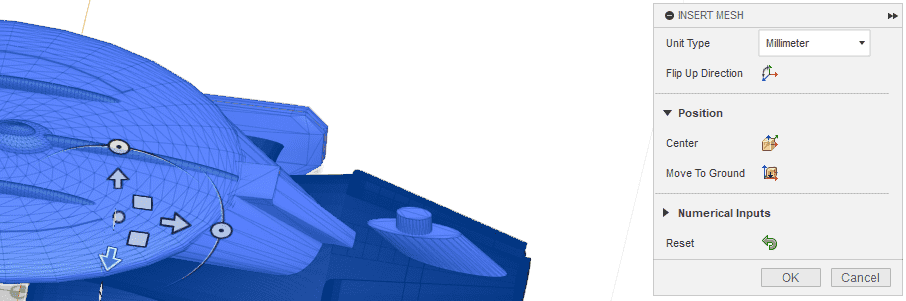
- Import the model by clicking “Insert” on the top bar. Then click on “Insert Mesh” and choose your STL file.
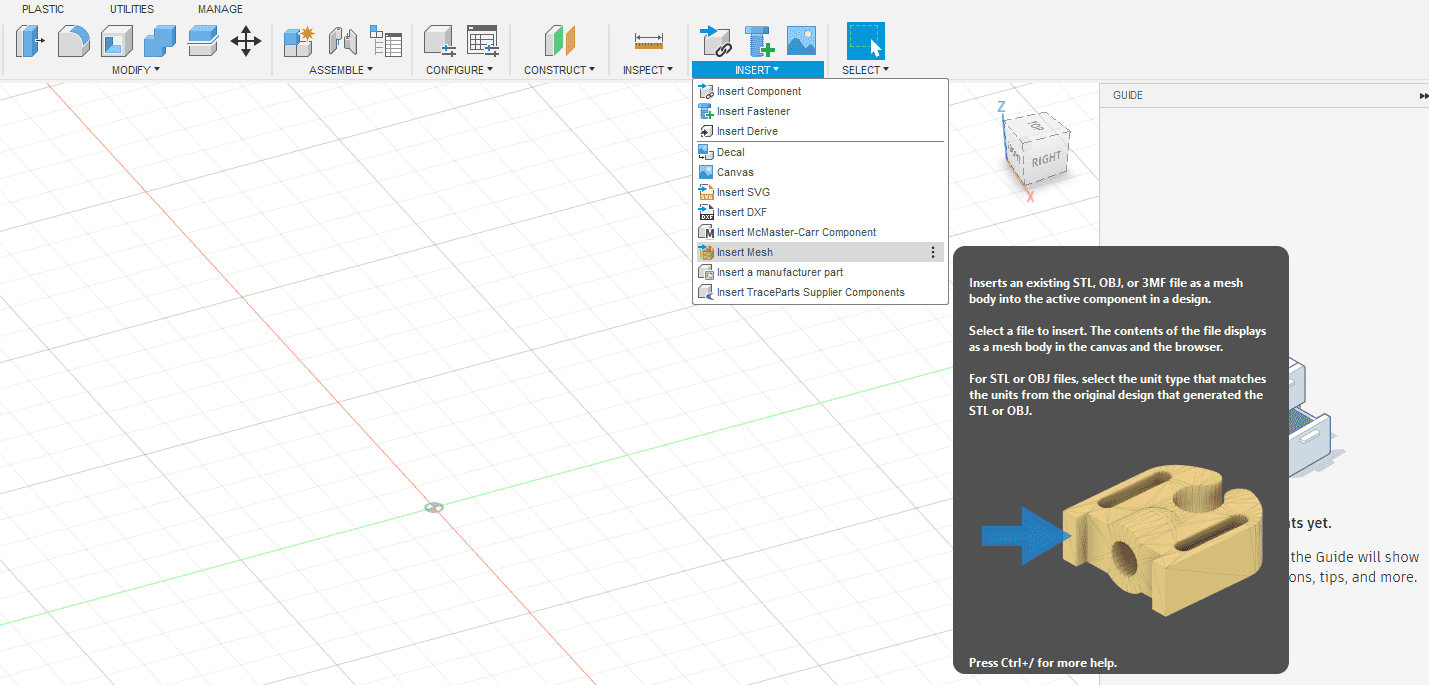
- Click “OK” from the panel on the right side of the screen to confirm your imported STL.
- Make sure to select your imported model by clicking on its name, inside the Browser panel on the left side.
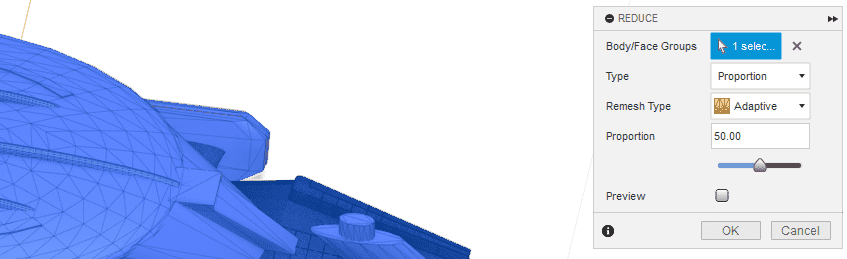
- On the top bar, select the “Mesh” tab and click on the “Reduce” icon
![]()
- Enter the percentage that you want to reduce the number of faces by, in the panel on the right. Press “OK” to perform the Reduce command.
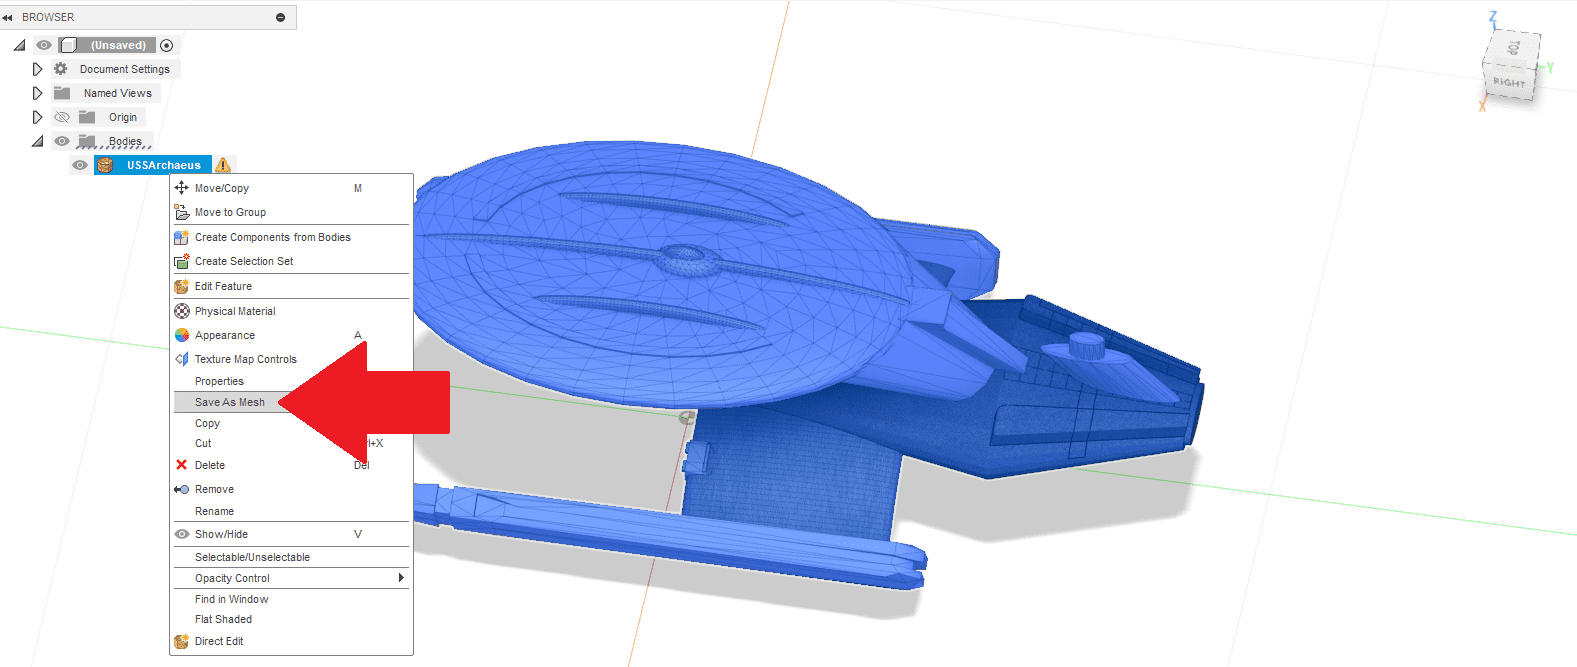
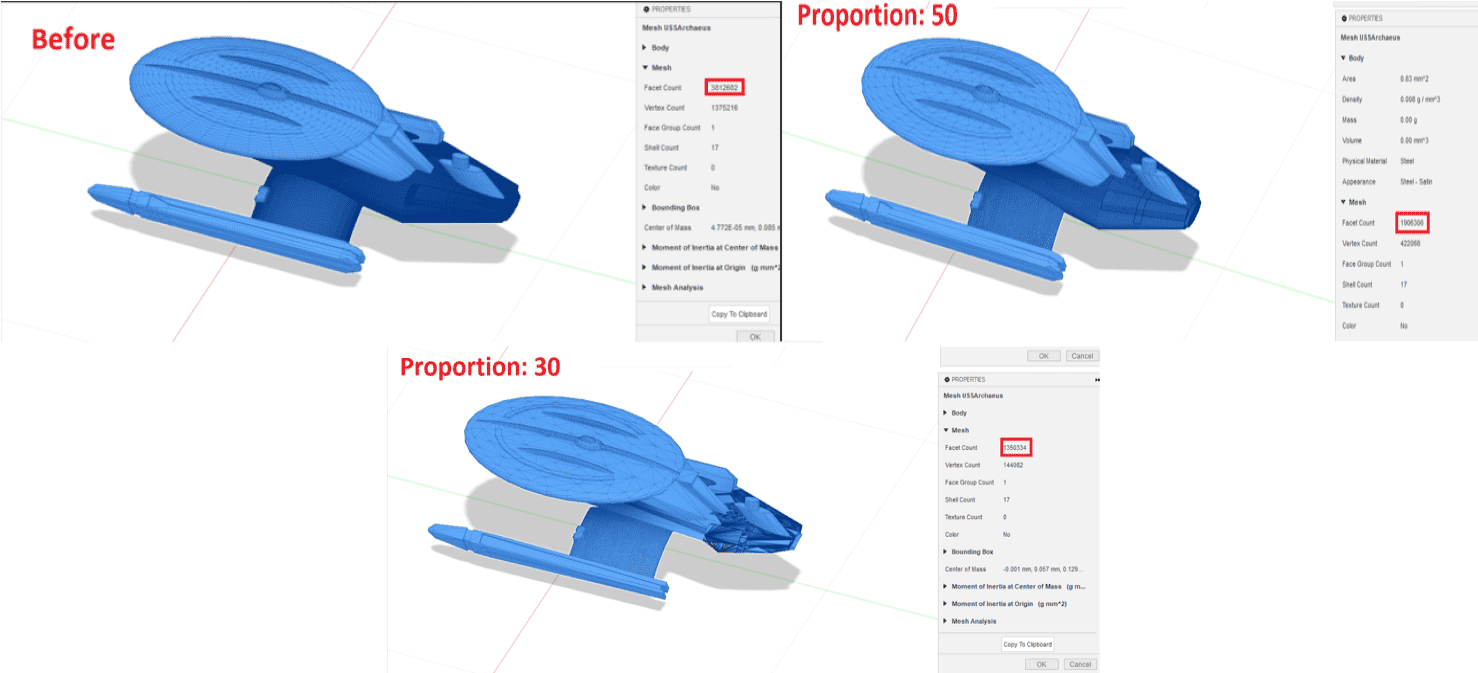
- Right-click on your mesh in the Browser panel and select “Save As Mesh” to save your file to disk.
When performing Fusion360’s Reduce command, proportions below 50% distorted the shape of the model. In contrast, Blender preserved the shape at a 20% proportion, resulting in much better compression. The number of faces went from 3,812,602 to 1,906,306 and the file size from 218MB to 93MB. Note that the difference in the number of initial triangles is because Blender and Fusion perform different processes when importing a mesh.
MeshLab
MeshLab is a lightweight open-source software that specializes in advanced 3D mesh processing. In MeshLab we can apply a special “Filter” to reduce the size of an STL.
- Import your model by going to File > Import Mesh and choosing your STL file.
- From the top bar, go to Filters > Remeshing, Simplification, and Reconstruction > Simplification: Quadric Edge Collapse Decimation (use the texture option if it applies to your mesh).
- Enter the proportion by which you want to simplify the mesh next to “Percentage reduction (0… 1)” and press “Apply”.
- When the process is finished. Press File > Export Mesh As to export your file. Make sure to choose.STL as the format.
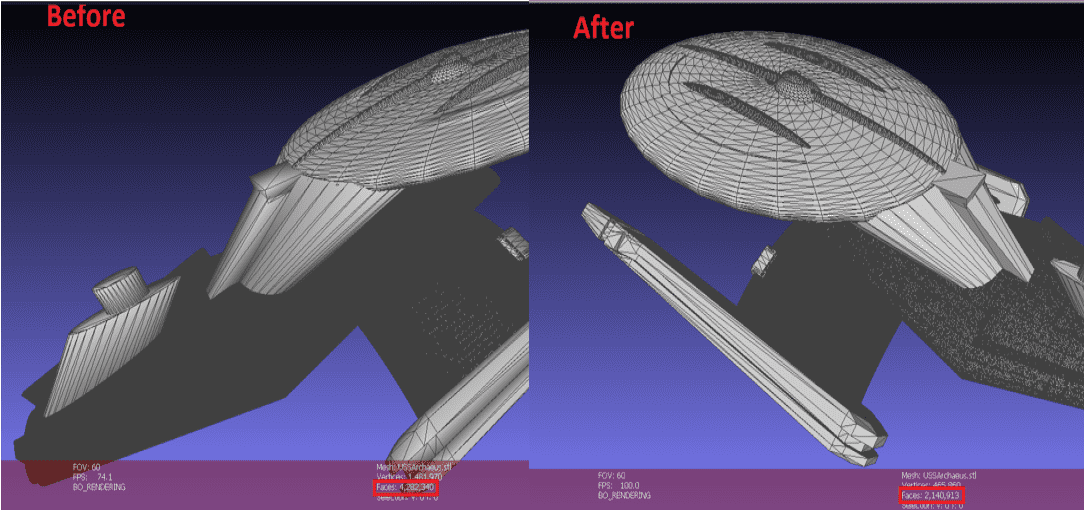
MeshLab loaded the large STL and performed the simplification operation quite quickly, but it resulted in broken triangles when small proportions were chosen. In the following picture, the result of using a 0.5 percentage reduction is shown. The number of triangles went from 4,282,340 to 2,140,913 and the STL model size went from 218MB to 104MB.
3DLess.com
This free online tool allows you to select your file in your browser and simplify it without installing anything. You can specify the number of vertices you want to keep from the original mesh. After running for a while, the results will be ready for download. The number of triangles for our test model was reduced from 4,282,340 to 3,208,506 and the file size went from 218MB to 156MB.
Decrease STL File Size Techniques
To choose the best tool to decrease STL file size, we will try to explain some different techniques that are used.
- Decimation
This is the process of reducing the complexity of a model by decreasing the number of triangles. Think of it as merging smaller triangles into larger ones. The resulting model will have a smooth appearance with less data and in turn a smaller 3D model file size.Pros: Easy to use alone, significant size reduction.Cons: Overusing can lead to loss of detail.
- Mesh Simplification
This technique is similar to decimation but focuses on optimizing the mesh structure while preserving detail. Imagine rearranging triangles instead of merging them, making the overall mesh more efficient to decrease STL file size
Pros: Less detail is lost in comparison to decimation.
Cons: Results may vary depending on mesh complexity and are not always viable.
Remember:
- Always keep a copy of your original STL before modifying it.
- Start with a small reduction value and gradually increase it, check the details at every step.
- Experiment with different techniques and software to find the best solution for your 3D model file size.
Make STL File Smaller Online; The Easiest Way
Nano3DTech offers a simple, fast, and free online tool to make STL files smaller online. Visit this link and simply upload your STL file. You can specify the smallest detail size to keep in millimeters and press “Simplify and Download”. This online tool runs in your browser, which means your STL files won’t be sent to any server. After processing your file for a while, it will give you the resulting file to download.